How to Create Unity Catalog Volumes in Azure Databricks
In building applications on Databricks, we frequently need to integrate data files from various systems. These files, varying in frequency and format, are typically directed to a landing zone, or a storage account. In the context of a medallion architecture, we often see raw files initially stored in an Azure ADLS account at the bronze layer. They are then processed and loaded into silver tables. Previously, mounted storage was the go-to method for accessing these external files, that is until Unity Catalog was introduced.
Databricks Unity Catalog introduced the managed and external volumes to allow raw file access from our notebooks. Similar to mount points, external volumes allows us to connect Azure ADLS storage accounts to Databricks and Unity Catalog through managed identities.
So, why opt for Unity Catalog over a traditional mount point? Governance. Unity Catalog offers centralized access, auditing, lineage and data discovery for a wide range of Databricks object types. This is a significant upgrade from the past, where governance of externally sourced raw data was not integrated into the Databricks security model.
In the following step-by-step guide, I'll demonstrate how to set up a Databricks instance on Azure. This includes attaching a storage account and enabling both managed and external volumes for direct file access. I'll use the Azure CLI for setting up the necessary Azure resources and then guide you through utilizing the Databricks workspace UI and notebooks to configure the volumes.
Architecture Review
Before we begin the setup, it's valuable to grasp how Azure resources interact with the Databricks Unity Catalog. My objective here is to construct a straightforward Unity Catalog using a singular Azure ADLS storage account to handle both managed and external volumes. Keep in mind, this is a basic deployment. In practical scenarios, you might encounter numerous external storage locations and a range of security considerations.
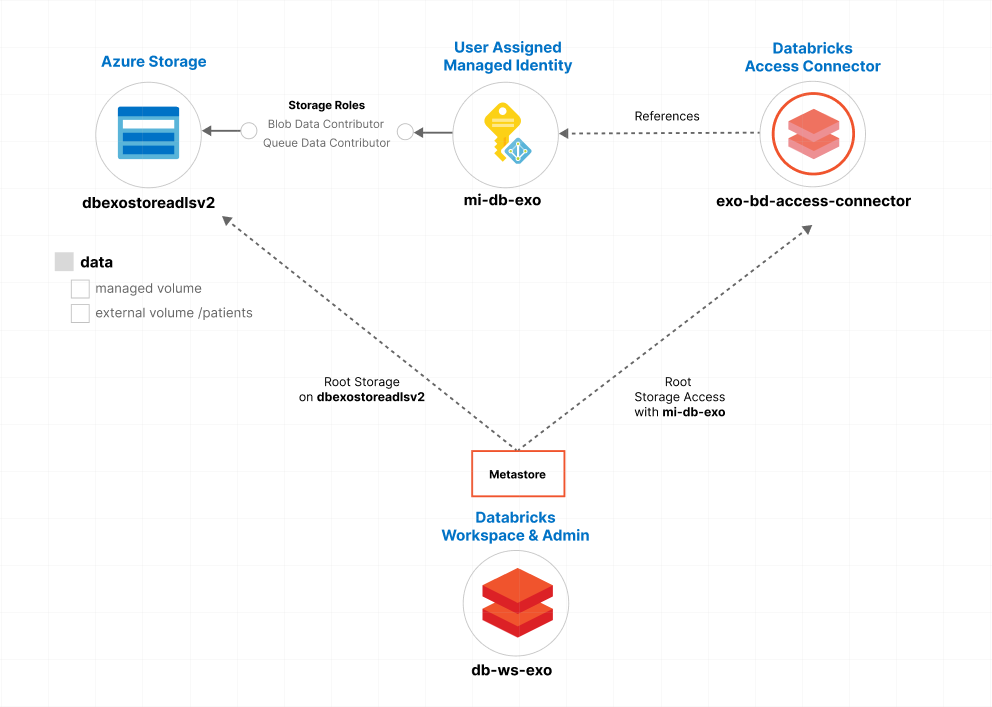
In Azure, a single subscription can include multiple workspaces, while the Unity Catalog is managed at a higher level through the Databricks account. Azure subscriptions have a one-to-many relationship with workspaces, and a one-to-one relationship with Unity Catalog. The Databricks account defines our Unity Catalog - or metastore - that is linked to a root storage account for managing Unity Catalog objects.
For my setup, I've designated an Azure storage container, named dbexostoreadlsv2, as the root storage for my metastore. Accessing this metastore, for reading and writing blob and queue data, is facilitated through a user-assigned managed identity, named mi-db-exo, linked with a Databricks Access Connector exo-bd-access-connector.
Within the Databricks account, the metastore is mapped to a workspace called db-ws-exo. After creating the mapping, clusters become 'Unity Catalog enabled. Given the correct permissions, cluster user may access external or managed volumes for direct file access.
Let's review the setup steps:
- Create an Azure Databricks Workspace - Build a new Azure Databricks workspace and account, where we will configure metastores and volumes.
- Create a Storage Account - To be used as our root container in for our metastore.
- Create a User Assigned Managed Identity - We create a user assigned managed identity to be used by the Databricks metastore (through the Access Connector) for access to storage as a blob and queue contributor.
- Associate Storage and Identity to a Databricks Access Connector - Setup a new Databricks Access Connector to connect managed identities to our Databricks account.
- Create a Databricks metastore - From the Databricks account console, we setup a new metastore and connect it to Azure Storage using the access connector and managed identity.
- Build a Cluster and Access Volumes - Setup a compute cluster and notebook to explore files in a managed and external volume.
The end result, we can access synthetic patient records from our Azure storage location through Unity Catalog external and managed volumes.
Steps to Create Unity Catalog Volumes
For this setup, I'll be utilizing the Azure CLI to create the necessary Azure resources. It's worth mentioning that you could also achieve this through the Azure Portal if you prefer. The configuration of Databricks, specifically setting up the metastore and root storage, will be done via the Databricks UI. During the process, there will be a few steps where we need to copy resource IDs or endpoints to configure the metastore. I'll explain how to retrieve each of these using the CLI.
Create a Databricks Workspace
Two steps here. First, let's setup a resource group for easy teardown after we are done. Then we can add a new Databricks workspace to the resource group.
az group create \
  --name rg-db-exo \
  --location westus2

az databricks workspace create \
  --resource-group rg-db-exo \
  --name db-ws-exo \
  --location westus2 \
  --sku premium
Note that SKU is premium vs. standard to enable Unity Catalog. I'm building in the WestUS2 Azure region. The name exo represent a fake company name I'm adding to my resources for clarity in the naming.
Create a Storage Account
Now we create a Azure Data Lake Storage Gen2. Storage accounts setup for Data Lake require us to enable the hierarchical directory structure. To enable this feature in storage, we pass in the -hns flag (alternatively we could use --hierarchical-namespace true.
az storage account create \
  --resource-group rg-db-exo --location westus2 \
  --name dbexostoreadlsv2 \
  --sku Standard_LRS \
  --kind StorageV2 --hns
Create a User Assigned Managed Identity
In this step, we'll create a user-assigned managed identity, which acts as a principal allowing Databricks to access the storage account. After creating this identity, we will assign two specific roles from this identity to the storage account. The following roles ensure Databricks has the necessary permissions for Unity Catalog to run over the storage account.
The Blob Contributor role allows Databricks, through the managed identity, to read, write, and delete Azure Storage containers and blobs, which is necessary for managing Unity Catalog Objects. Similarly, the Queue Contributor role is assigned to facilitate the handling of notifications for new file events.
The following command creates a managed identity called mi-db-exo. After the managed identity is created, az role assigns permissions to the identity on the storage account scope.
az identity create \
  -g rg-db-exo \
  -n mi-db-exo

principalId=$(az identity show \
  --name mi-db-exo \
  --resource-group rg-db-exo \
  --query principalId \
  --output tsv \
)

scope=$(az storage account show \
  --name dbexostoreadlsv2 \
  --resource-group rg-db-exo \
  --query id \
  --output tsv \
)

az role assignment create \
  --assignee $principalId \
  --role "Storage Blob Data Contributor" \
  --scope $scope

az role assignment create \
  --assignee $principalId \
  --role "Storage Queue Data Contributor" \
--scope $scopeAssociate Storage and Identity to a Databricks Access Connector
To enable Unity Catalog to access Azure Storage containers on behalf of its users, we need to set up an Access Connector within Azure Databricks. This Access Connector will reference the user-assigned managed identity we've created. It's important to recall that this identity has already been mapped to the storage with both Queue and Blob Contributor roles, facilitating the necessary access and permissions for the Unity Catalog operations.
The step enables two scenarios:
- Provides an identity for the Databricks metastore to access storage as the root storage (where we can build managed volumes and managed tables).
- Provides an identity to connect to external locations. In our example, we will create an 'external volume' in the same storage account.
You can learn more about managed vs. external tables from this Microsoft Create Tables article.
To create the access connector, we first query the resource id of the managed identity (different than the principal id we used during role setup). Copy the resource id of the managed identity from the cli output:
principalResourceId=$(az identity show \
  --resource-group rg-db-exo \
  --name mi-db-exo \
  --query id \
  --output tsv)

# ex: /subscriptions/<<SUBID>>/resourcegroups/rg-db-exo/providers/Microsoft.ManagedIdentity/userAssignedIdentities/mi-db-exo
And now we create the access connector. Take note that the identity type is UserAssigned which matches the type of identity we created.
az databricks access-connector create \
  --resource-group rg-db-exo \
  --name exo-db-access-connector \
  --location westus2 \
  --identity-type UserAssigned \
  --user-assigned-identities "{$principalResourceId}"
With all the Azure resources in place, it's a good point to pause and ensure everything is set up correctly in Azure. I usually take this moment to verify my resources. This includes checking that the managed identity is properly associated with the access connector and verifying it has the appropriate contributor roles on the storage account. Now that we've done this, we can proceed to set up our Databricks metastore and volumes.
Create a Databricks Metastore
The metastore serves as a top-level container for data within the Unity Catalog. One of the key features of the metastore is its capability to be linked with multiple workspaces. This means a single Unity Catalog can be utilized across various workspaces. Before we dive into setting up our metastore, it's beneficial to have a clear understanding of how our Azure subscription, Databricks accounts, and Databricks workspaces are interconnected and interact with each other.
Azure Subscription Relationship to Databricks Accounts & Workspaces
Kaniz, a community manager at Databricks, answered the following question in the forums.
What is the relationship between Databricks Account (as described in [1]) and Azure resources? Is Databricks Account created per Azure account? Or per Azure tenant? Or maybe per subscription?
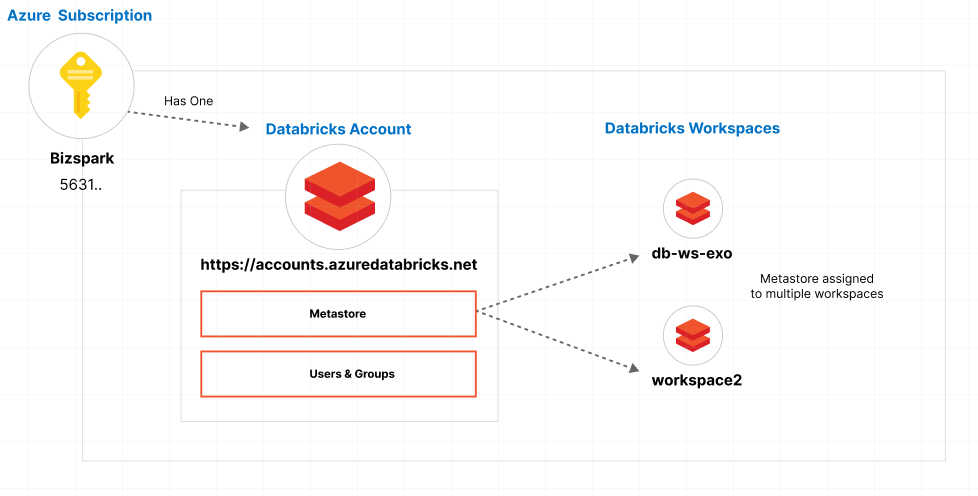
In this setup, the Databricks account is tied to an Azure subscription. Within this subscription, multiple workspaces, which exist as Azure resources, can be connected to a single metastore and account. It's important to note that for any specific region - in our case, westus2 - you are limited to having just one metastore.
In our scenario, the relationship between the subscription, account, and workspace is relatively straightforward. However, it's worth noting that in larger or more complex organizations, the management and design of subscriptions, accounts, and workspaces can be significantly more intricate.
In my specific example, I'm using a single subscription called Bizspark (an older subscription model). This subscription encompasses a Databricks account located at accounts.azuredatabricks.net. Associated with this account is a metastore, which in turn is linked to a single workspace named db-ws-exo, all situated within the westus2 region. If I decide to add another workspace, under the same subscription, I have the option to link this new workspace to my existing metastore and account. This would enable me to leverage the Unity Catalog across both workspaces.
Create the Databricks Metastore
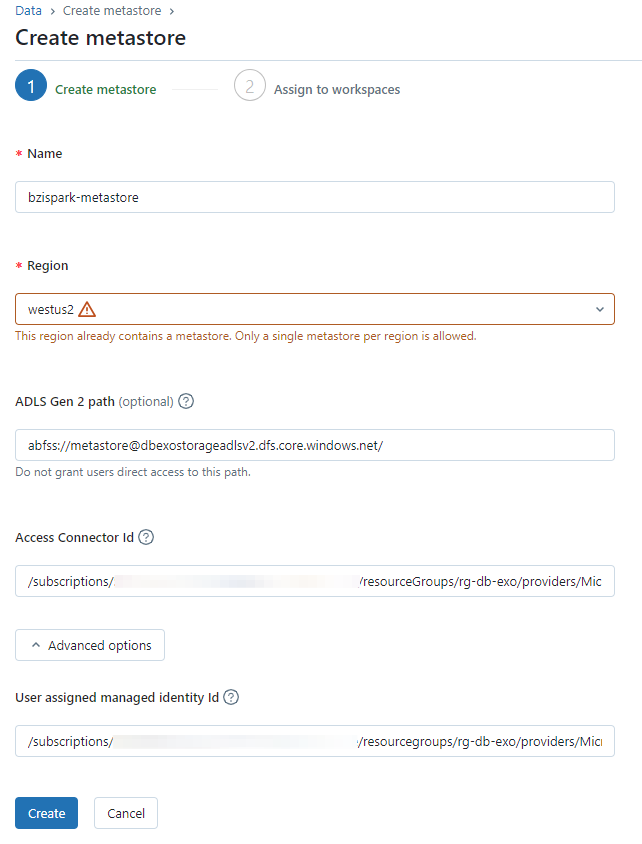
Open the Databricks account management site and select to Create Metastore. In this step, we name a new metastore and associate it with our Azure Storage account through the Databricks access connector and user assigned managed identity. You need three pieces of information to do this:
ADLS Gen 2 Path - This will be the default location for storing all managed objects across all catalogs in the metastore. The format for our storage endpoint is <container_name>@<storage_account_name>.dfs.core.windows.net/<path>. We need to create a container in the dbexostorageadlsv2 first. I'll call this container metastore.
az storage container create \
  --name "metastore" \
  --account-name "dbexostoreadlsv2"
For our setup, we will use the root path /. The endpoint then is: metastore@dbexostorageadlsv2.dfs.core.windows.net/
Access Connector Resource ID
The following query returns the resource id for our Databricks access connector.
az databricks access-connector show \
  -n exo-db-access-connector \
  --resource-group rg-db-exo \
  --query id

#output
/subscriptions/<SUBID>/resourceGroups/rg-db-exo/providers/Microsoft.Databricks/accessConnectors/exo-db-access-connector
User assigned managed identity id
Since we are using a user assigned managed identity, we must supply the resource ID for the identity under Advanced options on the metastore setup screen. You can query for the identifier:
az identity show \
  --name mi-db-exo \
  --resource-group rg-db-exo \
  --query id

#output
/subscriptions/<SUBID>/resourcegroups/rg-db-exo/providers/Microsoft.ManagedIdentity/userAssignedIdentities/mi-db-exo
Now we can create our metastore. I've named mine bizspark-metastore to keep in line with my subscription name. The region, westus2 also matches the region for my storage account and other resources supporting this Databricks install.
Once the metastore is created, you can navigate to the 'Workspaces' tab to assign the metastore to a specific workspace. In my case, I've chosen db-ws-exo. With this selection, the Unity Catalog metastore begins to track and manage metadata for various objects within the db-ws-exo workspace. This includes not only tables and volumes but also external locations and shares.

In the next section, we create a Unity Catalog enabled personal compute node along with a notebook to access managed and external volumes mapped in our metastore.
Build a Cluster and Access Volumes
From your Databricks account management screen, select workspaces and then db-ws-exo. The configuration tab contains a link to the workspace. Open the workspace. (ex: https://adb-<ID>.8.azuredatabricks.net/aad/auth) and select Compute from the left hand navigation.
For routine testing and development work, selecting a Personal Compute policy is a common practice. In our case, to effectively validate external and managed file access within the metastore, we'll set up a shared compute environment. We'll configure this using the runtime version 14.x-scala2.12. Here is the configuration:

Note the Summary section is tagged Unity Catalog. Now we can explore external and managed volume file access in a notebook.
Managed & External Volumes
Before we look at managed and external volumes, lets review the definition for each one from the Microsoft Create Volumes article.
- Managed Volume - A Unity Catalog-governed storage volume created in the default storage location of the containing schema.
- External Volume - a Unity Catalog storage volume registered against a directory with an external location using Unity Catalog-governed storage credentials.
External volumes are particularly useful in scenarios where you want to introduce governance to pre-existing files without the need for migration. For instance, if I already had a storage account named dbexostorageadlsv2 with data in its container, I could simply add a managed identity and a Databricks access connector. This would allow me to bring existing data under the governance of my metastore, which is a practical approach given that external systems frequently generate data that needs to be accessed in Databricks.
For the actual process of creating volumes in Unity Catalog, Microsoft offers a handy 'Volumes Quickstart (SQL)' notebook.
Managed Volume
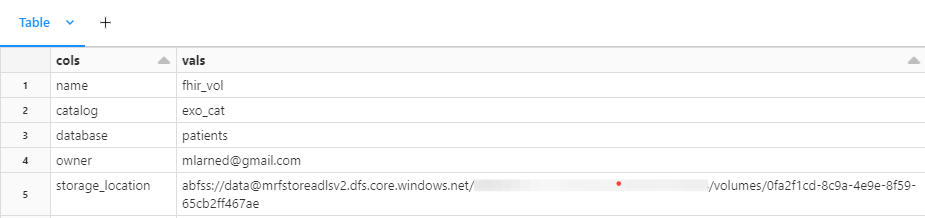
My cluster is running. I'm setting up a new catalog inside of my metastore (on the root storage), along with a schema and managed volume. The three part identifier for my new managed volume is exo_cat.patients.fhir_vol following the catalog.schema.volume format.
%sql
CREATE CATALOG IF NOT EXISTS exo_cat;
GRANT USE CATALOG ON CATALOG exo_cat TO `account users`;
USE CATALOG exo_cat;
CREATE SCHEMA IF NOT EXISTS patients;
CREATE VOLUME IF NOT EXISTS exo_cat.patients.fhir_vol;
DESCRIBE VOLUME exo_cat.patients.fhir_vol;
Using describe in python, we can view details about the managed volume. (Note my storage location is different than the one setup above- data is my root unity catalog storage container).
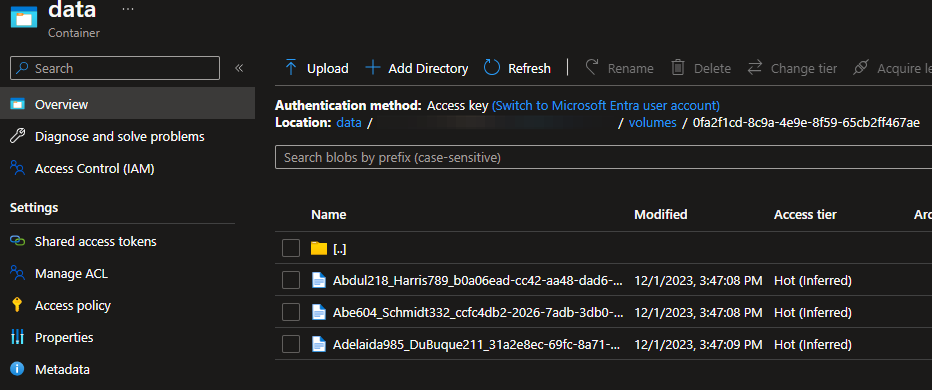
In storage explore, we can now open the data container and add files to the managed volume starting with ofa2.. I generated synthetic FHIR patient files (JSON) for testing.
And then back in the notebook, we can list files using dbutils
file_info_list = dbutils.fs.ls("/Volumes/exo_cat/patients/fhir_vol")
display(file_info_list)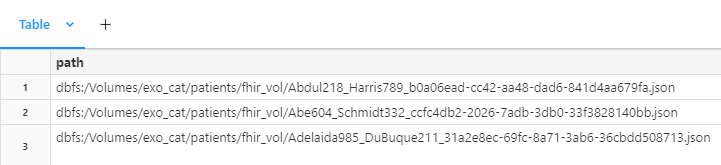
External Volumes
External volumes require us to tell Databricks where the storage for the volume is located and which storage credential to mount the volume. First, you can get the name of the storage credential by running :
%sql
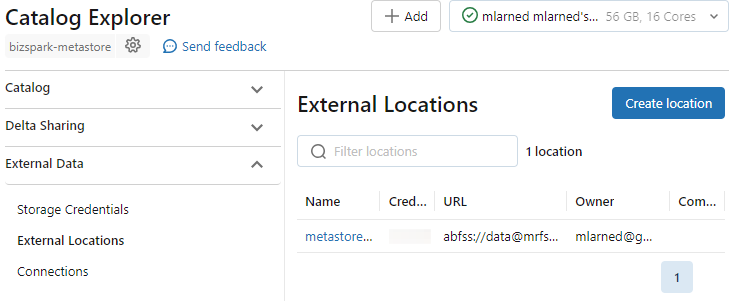
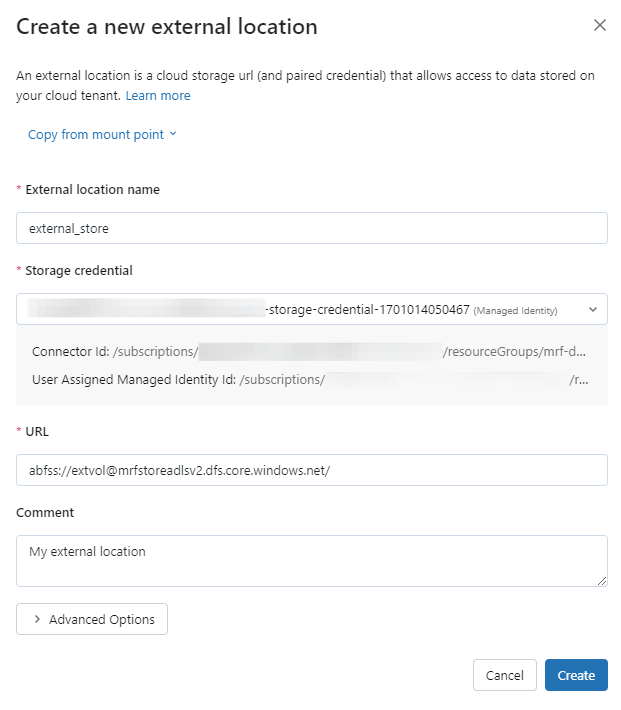
SHOW STORAGE CREDENTIALSThe output is a named credential <ID>-storage-credential-1701014050467 Copy the credential name and open the Catalog. I've setup a second container at abfss://extvol@mrfstoreadlsv2.dfs.core.windows.net/ to be the external volume. Open the Catalog Explorer - External Locations and select Create Location.
From the Create Location dialog, add the external location name, select the storage credential and add a comment. For the storage credential, the dialog displays the connector ID and User Assigned Managed Identity.
Resources
Microsoft - Use Azure managed identities in Unity Catalog to access storage
Azure Marketplace - Access Connector for Azure Databricks
Microsoft - Unity Catalog Best Practices
Micrsoft - Create Volumes